One topic that seems to have been played on repeat amongst our students in the last few months is detailing processes, and how rigidly they should be followed.
Processes are core to professional detailing. The correct detailing process (and there isn’t necessarily just one correct process) will make your work more streamlined and efficient, but there’s more to it than just simplifying work and maintaining consistency.
Not every car comes to your in a standard “grade three level” of contamination needing X,Y and Z steps every time – the real world just doesn’t operate like that – so we need our steps to be adaptable to situations to allow us to spend more or less time as required, reducing chemical costs and release wherever possible, and making the work as efficient for both ourselves and the customer as possible. Another primary reason for processes, though, is effectiveness and aggression limitation…
Imagine contaminants as layers – of course, in real life they don’t tend to organise themselves into neat, peelable sections, but using one chemical will not necessarily remove every contaminant from a surface, and some can have an adverse or reduced effect if used in the wrong order, wasting time and product when you then have to repeat a step or take remedial action.
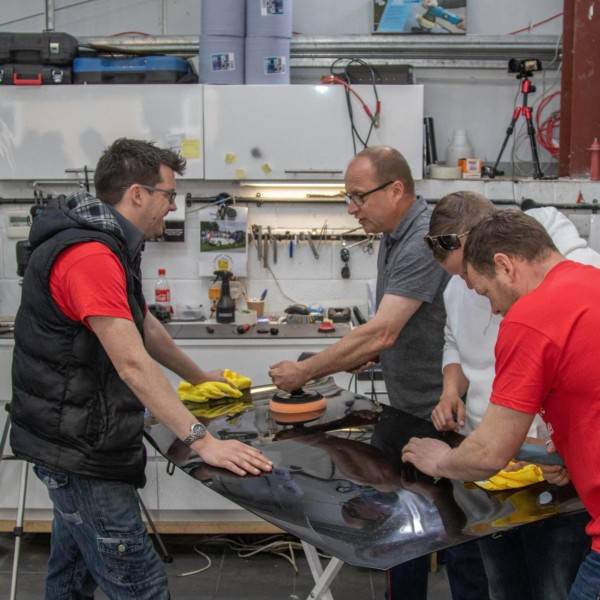
For example, we’ll take cleaning a hypothetical driver’s seat, which has rolled in covered with a buildup of several stains and contaminants over time.
Now, you have no accurate idea – beyond what a customer can tell you – what is actually on our dirty seat, so we follow a process combination of different chemicals and techniques to remove stains in a correct methodical manner, stopping at the point that the seat is clean:
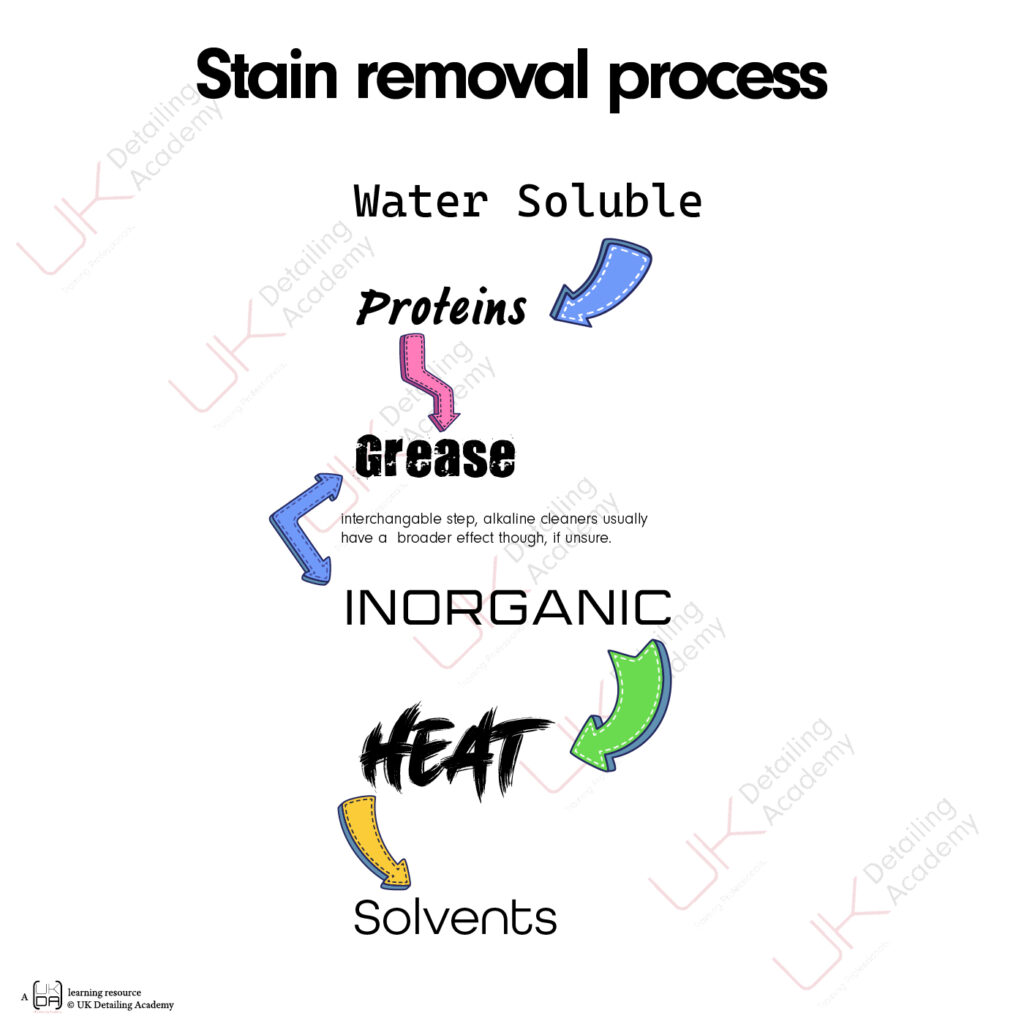
- Water – the first step, after vacuuming to see if it’s a dry, unbonded contaminant, is to see if it’s a water-soluble stain. We do this because water is:
a) Cheap
b) Effective
c) Reduces your overall chemical usage, which is safer from a perspective of personal use, client property, and environmental waste.
Water is called the “universal solvent” as it can dissolve more substances than any other liquid. Using just a damp cloth, or a wet vacuum with plain water flushing through a fabric will usually remove a huge majority of staining, and leave you with a better idea of anything which needs further attention, once dry.
- Next are proteins; we want to specifically target protein stains as they can be removed fairly easily if fresh, and they are the cause of a lot of bad odours, so we’re cleaning and sanitising in one step. Using an enzyme cleaner takes care of this, removing proteins and wrapping them in surfactants to be extracted and ensures fewer problems for later steps.
- Alkaline fabric cleaners are the broadest spectrum cleaners; they’re used in nearly every basic vehicle cleaning chemical and tackle grease, organic stains, and their foaming surfactants surround dirt, making it easy to extract.
- Acidic cleaners are next, and they are great at tackling inorganic stains and any organic stains which may be protected or shielded by something inorganic. Think of an egg with its contents encased in an inorganic calcium carbonate shell. In order to get to the egg contained, you need to break down the shell – this is what acidic cleaners will do to shielded contaminants – similar to waterspot removal or concrete cleaning – they still have surfactants though, so will clean well, but they’re usually more expensive.
Note: The acid/alkaline cleaner step is interchangeable, and if you believe a stain is being blocked by an inorganic top, then switching these around will potentially be more effective.
With us so far? This point is usually where a majority of staining is removed, dependant on the type and how long it has been on the surface. From here, we can get a bit more aggressive, and that does start to come with risks, so monitor your work and ensure you are conscious of leaving the area in a better state than when you started.
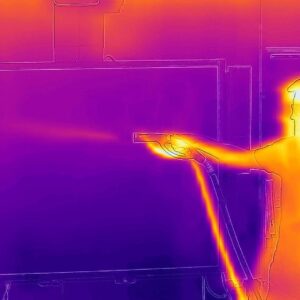
- Next is heat, such as using hot water in an extractor to flush instead, in order to to soften sugars or grease as it extracts, or a steamer to blow stains out and break them down with a bit of force + heat behind them.Heat will make chemicals work harder as it excites the molecules, but the pressure a steamer also puts out is akin to mechanical cleaning, so double the input. Try to blow stain out of fabrics with a steamer, instead of aiming down and pushing them in, catching anything on a cloth so it doesn’t simply spread.
Note also that we do this after our protein removal step, as the heat can cook proteins, turning them solid and near impossible to remove from between fibres – this includes stains such as milk, blood, eggs, anything which changes state when heated to around 60°c. – Process!
- If that hasn’t removed the stain, our last step, apart from repetition, is solvents. Solvents will be good at removing heavy hydrocarbons, melted sugars, and liquids such as dry oil-based paints. The issue is, most fabrics in vehicles are man-made plastics, which these chemicals can also attack, so using something designed for fabric such as dry cleaning solvent, or – in the case of oil based paint – the manufacturer recommended mineral spirits, is crucial, but must be identified as viable with test patches and should be approached with more caution that basic cleaning chemicals to avoid accidental damage or colour bleaching.
So you see, by following our process, we can remove every type of stain present on a seat, without overlapping into steps which could cause damage. We limit the chemicals used by tackling the most common to least, and we have a plan of attack we can use in every situation as a starting point when we are unsure.
Processes must also be adaptable, though.
If you turn up to a car with a layer of fine dust on it, using a full decontamination wash isn’t efficient and would be a waste of chemicals, time and effort, and cost to the customer. In these cases, you can alter it, removing unnecessary steps as required – according to the situation and your experience.
To extend the hypothetical seat clean above, if you see only paint on the surface and it doesn’t come out with water, you can assume it’s an oil based paint. You can adapt by trying an alkaline cleaner next, then move straight to mineral spirits to further remove it if necessary, followed by another round of cleaner to extract any solvent residue.
Four steps used in this case:- the first to identify the stain, the second to try a minimal risk solution, the third to use a likely solution, the fourth to finish and leave the seat in good order.
Processes are a starting point for consistency. Get yours in place and you’ll enhance every aspect of your work.
—
Processes are taught as part of every course we run, the example above comes from our Advanced Interiors course, which you can check out here.
![]()